Quick tip, give your AI agent this prompt to get started:
“Read https://docs.athemes.com/article/abilities-in-sydney.md and tell me what you can do on my Sydney site.”
In this guide, we’ll walk you through how to enable AI Abilities in Sydney, connect your AI assistant, and try some example prompts.
Requirements:
- Your site must be running WordPress 6.9 or later, which includes the WordPress Abilities API. On older versions, the free WPVibe plugin adds the required support.
- The Sydney theme must be installed and activated on your site, version 2.70 or later. If you’re using Sydney Pro, you’ll need version 4.3.0 or later.
- The free WPVibe plugin is required to connect AI assistants like Claude, ChatGPT, or Cursor. We’ll cover installing it below.
What AI assistants can do in Sydney
Once AI Abilities is enabled, your assistant can work with:
- Colors: Read and change your site-wide color palette.
- Typography: Read and set fonts, font sizes, and text styles.
- Custom CSS: Read and update your site’s Additional CSS.
- Header and footer: Inspect and edit your header and footer builder layouts.
- Patterns and pages: Browse Sydney’s block patterns and build new pages from them.
- Starter sites: Set up the aThemes Starter Sites plugin and import demo websites.
Every change goes through the same checks the Customizer uses, and updates show up in the Customizer right away. Nothing your assistant does is hidden, and you can adjust or undo any change with the normal Customizer controls.
Enabling AI Abilities
AI Abilities is turned off by default. To enable it, log in to your WordPress admin area and go to Sydney » Theme Dashboard and open the Settings tab.
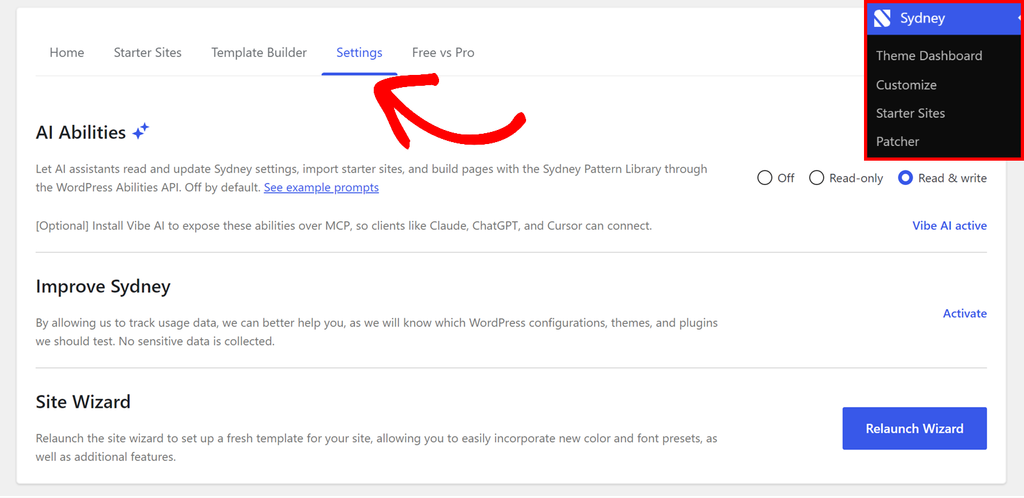
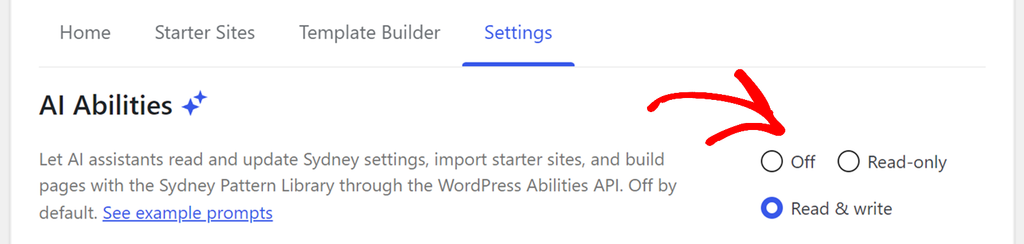
Here you’ll see three access modes in the AI Abilities section:
- Off: The default. No abilities are available to AI assistants.
- Read-only: Assistants can look up your current settings but can’t change anything.
- Read & write: Assistants can read your settings and make changes, build pages, and install recommended plugins.
Select the mode you’d like to use. Your choice is saved automatically.
Note: When you select Read & write, every logged-in user who can edit theme options, including AI clients connected to your site, can change theme settings, install recommended plugins, and create pages. You can switch back to Read-only or Off at any time.
Installing WPVibe
To connect AI assistants like Claude, ChatGPT, or Cursor to your site, you’ll need the free WPVibe plugin. It exposes Sydney’s abilities over MCP, the open standard AI assistants use to connect to external tools. It also adds Abilities API support to sites running WordPress versions older than 6.9.
In the AI Abilities section, click Install WPVibe. The plugin installs and activates in one step, and a new WPVibe item appears in your admin sidebar.
Connecting your AI assistant
Next, go to WPVibe in your admin sidebar. This page walks you through the connection in three short steps.
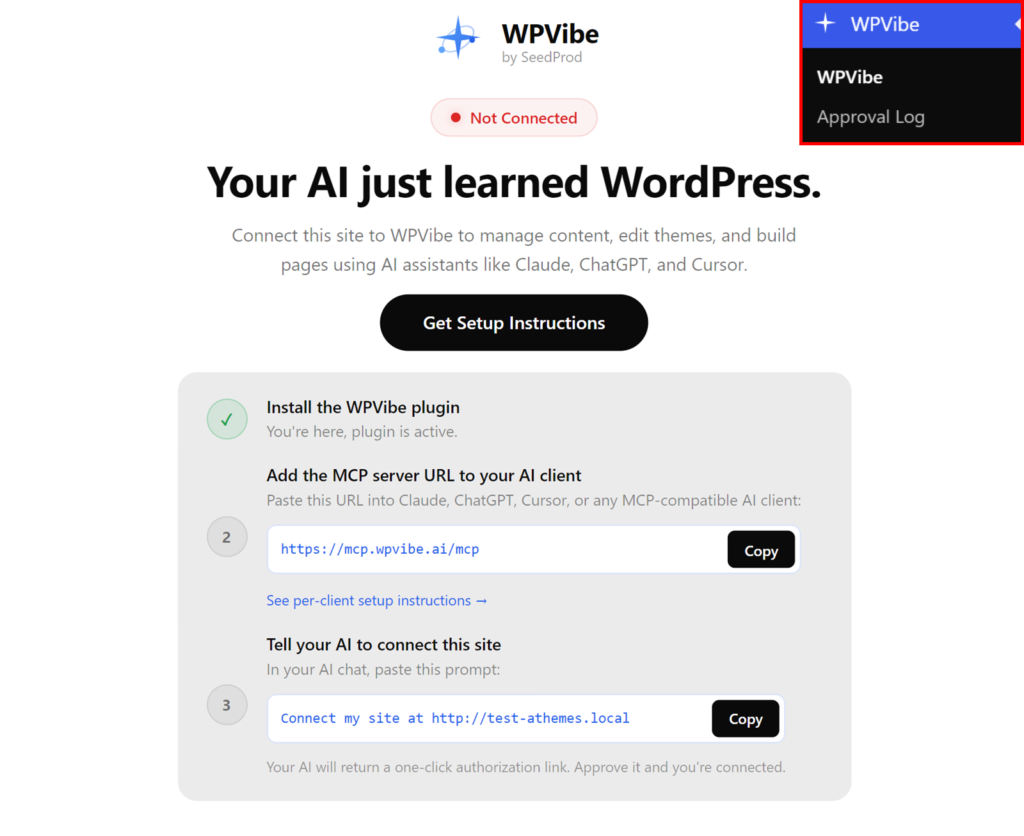
First, copy the MCP server URL shown on the page:
https://mcp.wpvibe.ai/mcp
Then add it to your AI client:
- Claude (web): Go to Settings » Connectors, click Add custom connector, and paste the URL.
- Claude Desktop: Go to Settings » MCP and add a remote server with the URL.
- ChatGPT: Add the official WPVibe app from ChatGPT’s app directory and click Connect. Apps attach per conversation, so in any new chat, click the + button in the message box and choose WPVibe.
- Cursor: Open the MCP section in Cursor’s settings and add a remote server with the URL.
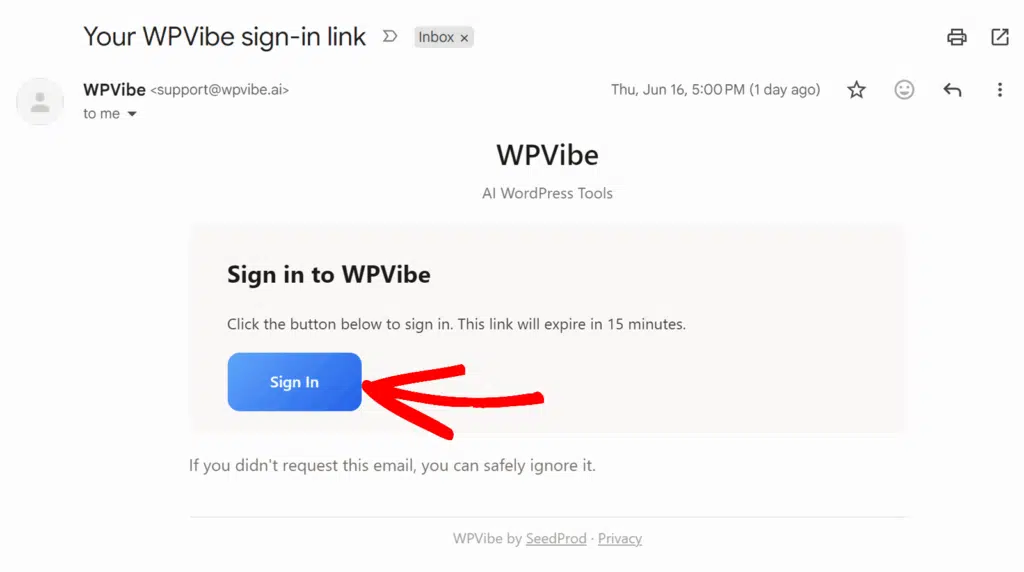
When you add the connector, WPVibe asks you to sign in with your email address. You’ll receive an email with a sign-in button that’s valid for 15 minutes. No password is needed, and your site credentials are never shared in the chat.
Finally, paste this prompt into your AI chat, replacing the URL with your own site’s address:
Connect my site at https://example.com
Your assistant will reply with an authorization link. Click the link to open the approval page in your browser, then confirm that you want to give your assistant access to the site. Once you’ve confirmed, your site is connected and you’re ready to start prompting.
Trying example prompts
You’re all set. Below you’ll find ready-to-use prompts for everything Sydney’s abilities can do, organized by topic. Copy any prompt into your AI chat, or use them as a starting point for your own requests.
Tip: Start your session by telling your assistant to look up what Sydney can do. For example: We'll use Sydney's abilities for this session. Please discover them and use them for the tasks I give you.
You’ll also get more reliable results if you mention the ability name in your prompt. For example: Make my accent color a warm coral (use ability: sydney/update-global-colors). Each ability’s name is listed with its prompts below.
Quick start
One prompt can take a blank site to a branded one, setting the title, importing starter content, and applying coordinated colors and fonts in a single request:
- Help me set up my new Sydney site. Call it Northwind Digital, import a starter site that suits a digital/creative agency, then give it a bold, modern, confident look with a distinctive display-style heading font pairing. My business email is [email protected] and phone is (555) 010-2020.
Colors
Get global colors (sydney/get-global-colors): Reads every color in your site-wide palette and what each one is used for.
- What are my current site colors?
- Show me my color palette and what each color is used for
- What hex value is my accent color right now?
Update global colors (sydney/update-global-colors): Changes one or more of your site-wide palette colors. Colors you don’t mention are left unchanged.
- Make my accent color a warm coral
- Set my headings to dark navy and my body text to a softer dark gray
- Change my accent color to #2563eb
- Give the site a calmer palette with a muted sage green accent on an off-white background
- Make my borders and dividers a lighter gray
Typography
Get typography (sydney/get-typography): Reads your body and headings fonts, style settings, and responsive font sizes.
- What fonts is my site using?
- Show me my current typography settings
- What are my heading font sizes on desktop vs mobile?
Update typography (sydney/update-typography): Sets fonts, style settings, and responsive font sizes. Any setting you don’t mention stays as it is.
- Use Inter for body text and Poppins for headings
- Make my headings uppercase with a bit more letter spacing
- Increase the body line height so paragraphs are easier to read
- Set my H1 to 48px on desktop, 36px on tablet, and 28px on mobile
- Switch my body font to the system default
- Make my headings italic
Custom CSS
Get Additional CSS (sydney/get-custom-css): Reads the Additional CSS saved on your site, the same stylesheet the Customizer’s Additional CSS editor writes to.
- Show me my site’s custom CSS
- What’s in my Additional CSS right now?
- Do I have any custom CSS applied?
Update Additional CSS (sydney/update-custom-css): Replaces your site’s Additional CSS. Your assistant reads the current CSS first, then sends back the complete stylesheet with your change included.
- Add custom CSS to give all my buttons rounded corners
- Hide the page title on my blog posts with some custom CSS
- Add a bit more spacing between my sections using custom CSS
- Clear all my Additional CSS
- Round the corners on all my buttons with custom CSS, and keep whatever CSS I already have
Header and footer
These prompts work with Sydney’s header and footer builder: the rows, columns, and components that make up your header and footer. To learn more about the builder itself, see our guide on configuring the header layout in Sydney.
Get header/footer layout (sydney/get-hf-layout): Reads your full builder layout, including every row, device, and column.
- Show me how my header is laid out
- What’s in my footer right now?
- List the rows and columns of my header builder
List header/footer components (sydney/list-hf-components): Lists the components you can add to each area and device.
- What components can I add to my header?
- Which footer components are available?
- What can I put in the mobile header?
Get component settings (sydney/get-hf-component-settings): Reads the content and settings of one builder component, like a button’s text and link.
- What does my header button say and where does it link?
- Show me the settings for the logo in my header
- What’s the current copyright text in my footer?
Add component (sydney/add-hf-component): Adds a component to a builder row at the position you choose.
- Add a search icon to the right side of my header
- Put a call-to-action button in the center of my main header row
- Add a hamburger menu to my mobile header
- Add social icons to my footer
Remove component (sydney/remove-hf-component): Removes a component from your header or footer.
- Remove the search icon from my header
- Take the button out of my footer
- Delete the social icons from my header
Move component (sydney/move-hf-component): Reorders a component within a column or moves it to another column.
- Move my logo to the left of the header
- Put the menu in the center instead of the right
- Reorder my header so the button comes before the search icon
Update component settings (sydney/update-hf-component-settings): Changes a component’s content and settings.
- Change my header button text to “Get a quote” and link it to /contact
- Update my footer copyright to “© 2026 Acme Co. All rights reserved.”
- Hide the header search icon on mobile
- Add my Instagram and LinkedIn links to the footer social icons
You can also combine several steps in one prompt:
- Build me a header with the logo on the left, the menu in the center, and a “Contact us” button on the right
- Move my header button to the right and change its text to “Book now”
- Replace the search icon in my header with social icons
Patterns and pages
List Sydney patterns (sydney/list-patterns): Lists the block patterns available in Sydney and Sydney Pro.
- What block patterns does Sydney offer?
- Show me the available hero patterns
- List the patterns I can use to build a page
Create page from patterns (sydney/create-page-from-patterns): Builds a new page by combining Sydney patterns in the order you describe.
- Build me an About page with a hero, a team section, and a contact call-to-action
- Build and publish a landing page with a hero, features grid, and pricing section, alternating section backgrounds so no two adjacent sections share the same shade
- Make a full-width Services page from the Sydney patterns and save it as a draft
- Put together a homepage: pick a hero, a features section, and a testimonials block, then create the page
Starter sites
Install starter sites (sydney/ensure-starter-sites-plugin): Installs and activates the aThemes Starter Sites plugin so your assistant can import ready-made demo websites.
- I want to import a ready-made demo site, set that up for me
- Import the free Agency starter site
- Install the starter sites plugin so I can import demo content
Frequently asked questions
Below, we’ve answered some of the most common questions about AI Abilities in Sydney.
Do I need the WPVibe plugin?
You need it to connect external AI assistants like Claude, ChatGPT, or Cursor, since they reach your site over MCP through WPVibe. It’s also required on sites running WordPress versions older than 6.9, where it provides the Abilities API itself.
Is it safe to give an AI write access?
Write access is off by default, and only administrators can enable it. Every change runs through WordPress permission checks and the same validation the Customizer uses, so invalid values are rejected before anything is saved. All changes appear in the Customizer, where you can review or undo them, and you can switch back to Read-only or Off at any time.
Does this work on a local or staging site?
AI assistants connect from the cloud, so your site needs to be reachable from the public internet. Sites on local development environments, behind firewalls, or on private networks won’t be available to your assistant.
Why don’t I see the AI Abilities section?
Make sure your theme is updated to Sydney 2.70 or later, or Sydney Pro 4.3.0 or later. You’ll find the section under Sydney » Theme Dashboard in the Settings tab.
That’s it! You’ve successfully enabled AI Abilities in Sydney and connected your AI assistant to your site.
Next, would you like to build your header, footer, and other theme parts with blocks yourself? Check out our guide on using the Block Templates module in Sydney to learn more.
