Would you like to let customers choose when their order arrives, or pick it up from your store? The Delivery & Pickup module in Merchant Pro adds delivery dates, time slots, and pickup locations to your WooCommerce checkout, with optional fees and booking limits.
This tutorial will show you how to set up and use the Delivery & Pickup module in Merchant Pro.
Table of Contents
- Enabling the Delivery & Pickup Module
- Creating a Delivery Schedule
- Adding Pickup Locations
- Customizing the Checkout Display
- Adding Booking Details to Order Emails
- Setting Up Customer Notifications
- Configuring Orders and Operations
- Viewing Delivery and Pickup Options at Checkout
- Managing Deliveries and Collections
- Frequently Asked Questions
Requirements:
- You’ll need Merchant Pro to access the Delivery & Pickup module
- Ensure that you’ve installed Merchant and Merchant Pro version 2.3.2 or higher to meet the minimum required version for the Delivery & Pickup module
- WooCommerce version 6.4.0 or higher must be installed and active on your site
Before you get started, make sure you’ve installed and activated the Merchant plugin on your WordPress site. You’ll also need to install Merchant Pro and activate your Merchant Pro license.
Enabling the Delivery & Pickup Module
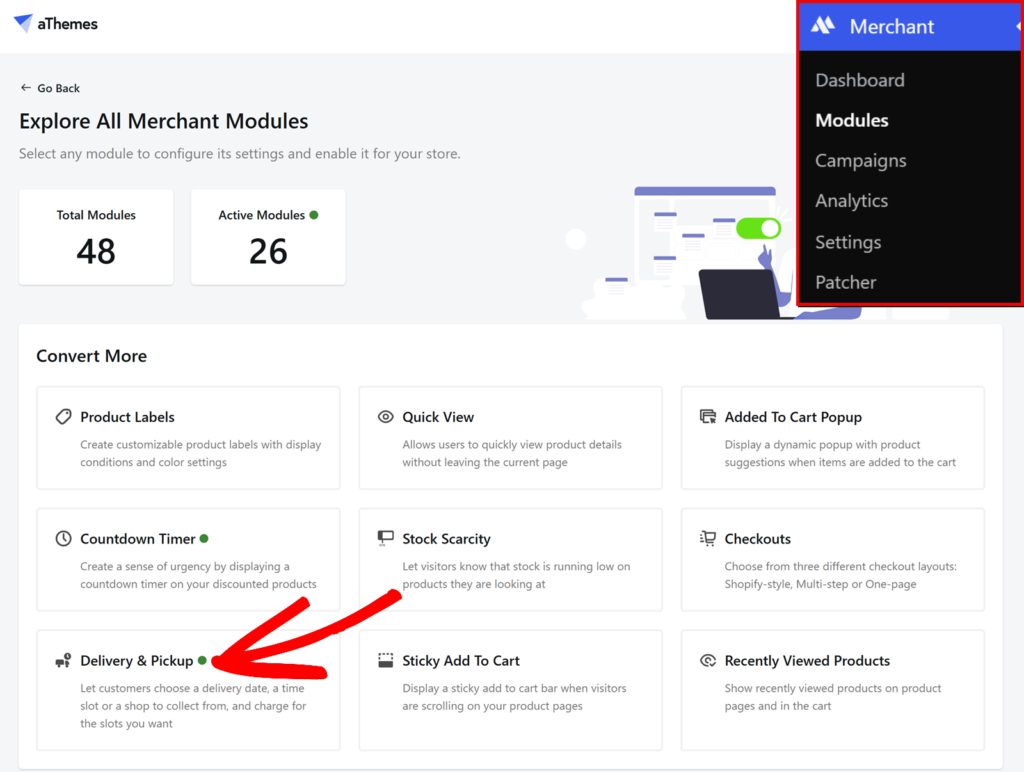
To get started, go to Merchant » Modules in your WordPress admin area. In the Convert More section, click Delivery & Pickup.
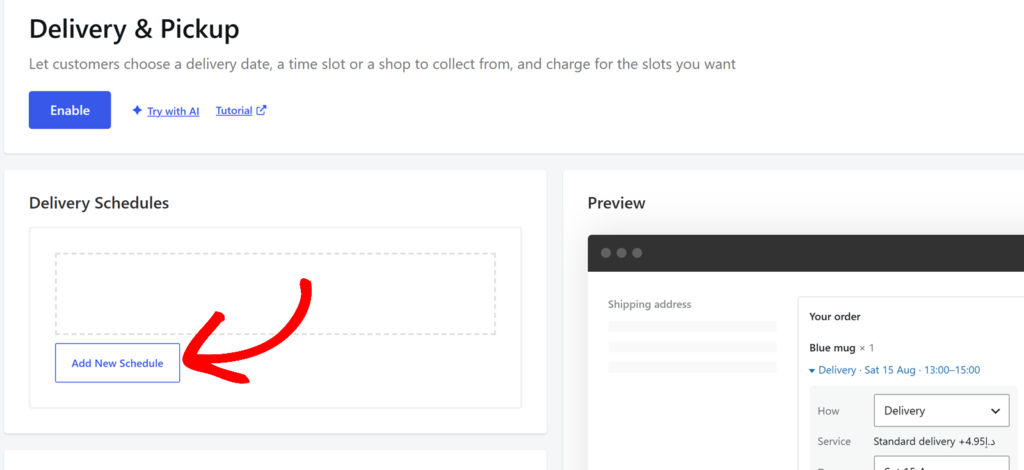
At the top of the module’s settings page, click the Enable button. Customers won’t see any options at checkout until you add a delivery schedule, which we’ll cover next. As you change the settings, the Preview pane on the right shows a sample checkout.
Creating a Delivery Schedule
A schedule is a service customers choose at checkout, such as standard delivery or in-store pickup. In the Delivery Schedules section, click Add New Schedule and fill out the settings below.
Setting Up the Schedule Details
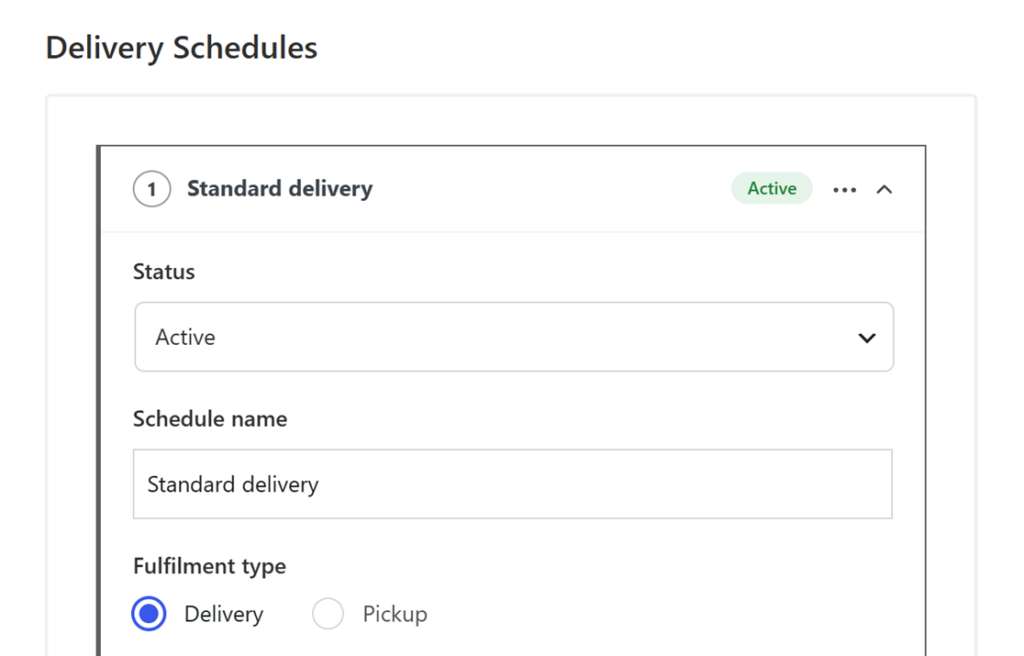
- Status: Choose Active to show the schedule at checkout, or Inactive to hide it.
- Schedule name: The name of the service customers see, such as “Standard delivery.”
- Fulfilment type: Choose Delivery for orders you bring to customers, or Pickup for orders customers collect. Customers see pickup as Collection at checkout.
Setting the Availability
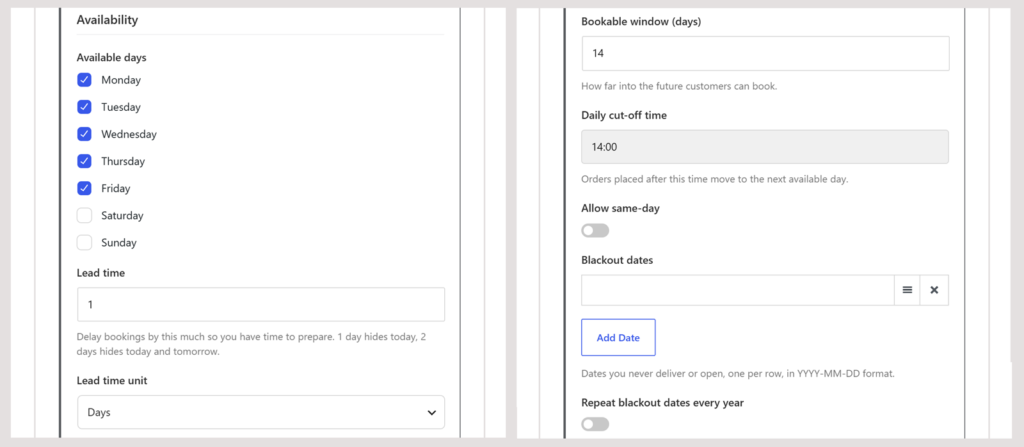
- Available days: The days of the week you offer this service.
- Lead time and Lead time unit: How much notice you need before a booking, in Hours or Days. For example, a lead time of 1 day hides today at checkout.
- Bookable window (days): How far ahead customers can book. The default is 14 days.
- Daily cut-off time: Orders placed after this time move to the next available day.
- Allow same-day: Lets customers book for today. This only works when the lead time is less than 1 day.
- Blackout dates: Days you don’t deliver or open, such as holidays. Click Add Date and enter each date in YYYY-MM-DD format. Turn on Repeat blackout dates every year to reuse them every year.
Setting Up Time Slots and Capacity
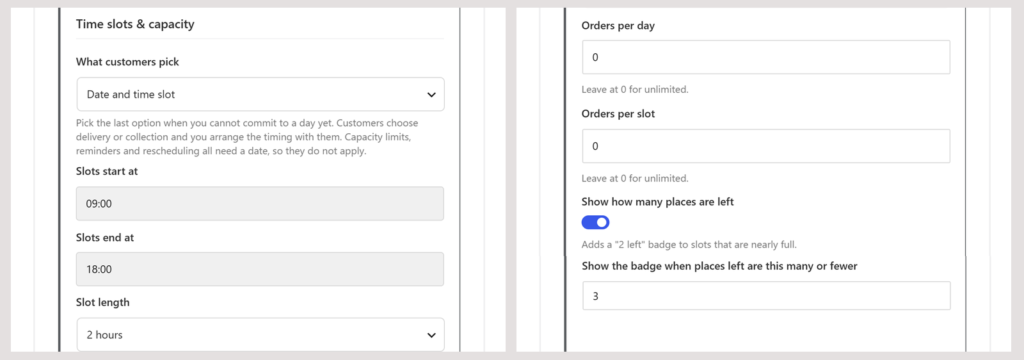
- What customers pick: Choose Date and time slot to let customers pick a day and a time, or Date only to let them pick just a day. Choose Neither (no date to choose) if you’ll arrange the timing with each customer yourself. Booking limits, reminders, and rescheduling don’t work without a date.
- Slots start at, Slots end at, and Slot length: Your booking hours and the length of each slot, from 15 minutes to 4 hours. For example, 09:00 to 18:00 with 2-hour slots gives customers four slots, starting at 09:00, 11:00, 13:00, and 15:00.
- Orders per day and Orders per slot: The most bookings you accept. Leave them at 0 for no limit. Once a day or slot is full, customers can’t select it.
- Show how many places are left: Adds a badge like “2 left” to slots that are nearly full. Use Show the badge when places left are this many or fewer to decide when it appears.
Adding a Delivery Fee
To charge for this service, turn on Charge for this schedule and configure these settings:
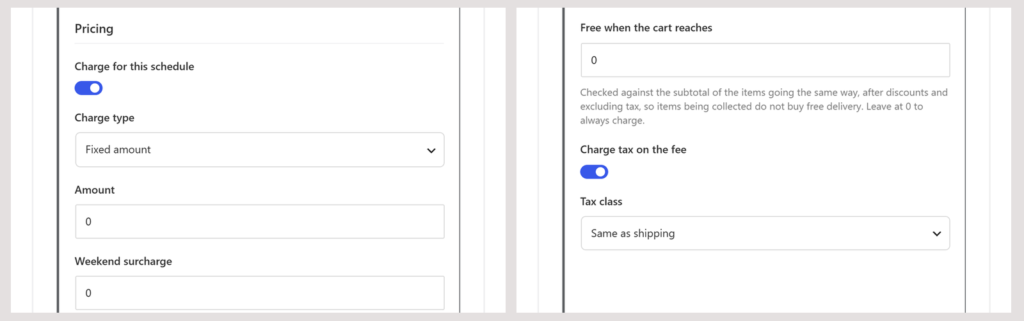
- Charge type: Choose Fixed amount for a flat fee, Percentage of the cart subtotal, after discounts for a percentage, or Amount per item to charge for each item.
- Amount: The fee, percentage, or per-item price.
- Weekend surcharge: An extra amount for Saturday and Sunday bookings.
- Same-day surcharge: An extra amount for bookings made for today. This field appears when Allow same-day is turned on.
- Free when the cart reaches: Waives the fee once the products using this schedule reach this amount. Leave it at 0 to always charge.
- Charge tax on the fee and Tax class: Whether the fee is taxed and which tax class it uses. Same as shipping uses your WooCommerce shipping tax class.
At checkout, the fee appears as its own line in the order totals, named after the schedule.
Choosing Who Gets the Schedule
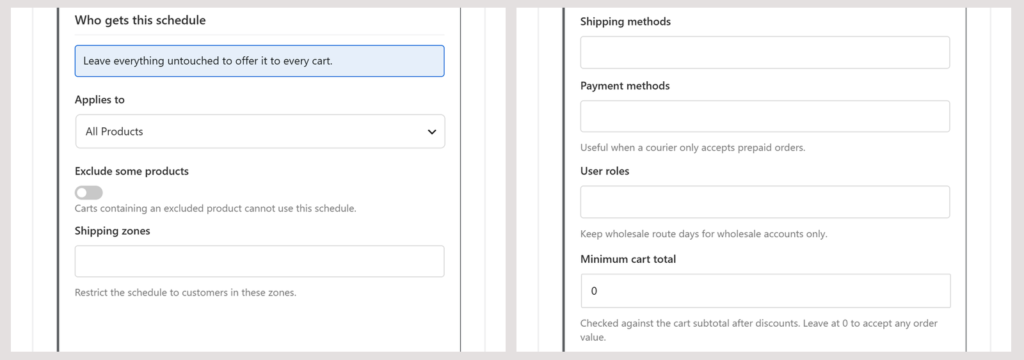
Leave these settings empty to offer the schedule to every cart. If you set more than one, the cart must meet all of them.
- Applies to: Choose All Products, or limit the schedule to Specific Products, Specific Categories, Specific Tags, or Specific Brands. A field appears where you select them.
- Exclude some products: Select the products, categories, or brands that can’t use this schedule.
- Shipping zones: Lists your WooCommerce shipping zones, such as United States (US). The schedule only shows to customers in the zones you select.
- Shipping methods: Lists your shipping methods, such as Flat rate, Free shipping, and Local pickup. The schedule only shows when the customer picks one of the methods you select. This field is only available for delivery schedules.
- Payment methods: Lists the payment methods enabled in WooCommerce, such as Cash on delivery. The schedule only shows when the customer pays with one of the methods you select.
- User roles: Lists your site’s user roles, such as Customer and Shop manager. The schedule only shows to logged-in customers with the roles you select, so guests won’t see it.
- Minimum cart total: The cart subtotal, after discounts, that customers need to reach before the schedule appears.
Once you’re done, click Save at the top of the page. To offer another service, click Add New Schedule again.
Adding Pickup Locations
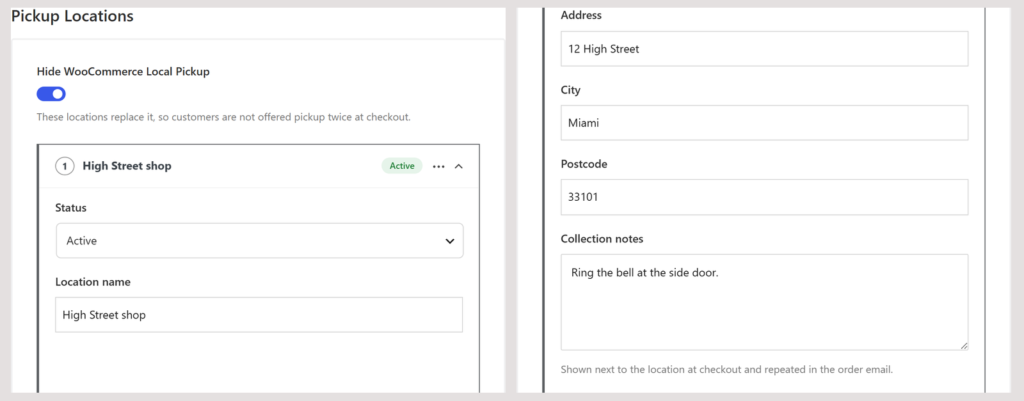
If you offer pickup, add the places customers collect their orders from. Keep Hide WooCommerce Local Pickup turned on, so customers aren’t offered WooCommerce’s own pickup option as well. Then click Add New Location and fill out the location details:
- Status, Location name, Address, City, and Postcode: The details customers see at checkout and in their emails.
- Collection notes: Pickup instructions, such as where to park or which door to use.
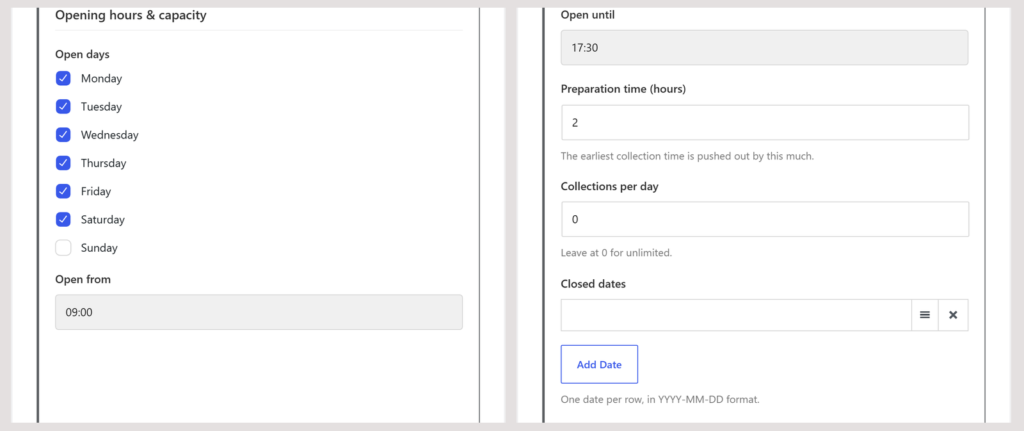
Next, set the location’s opening hours and capacity:
- Open days, Open from, and Open until: When the location is open. Customers can only book collections inside these hours.
- Preparation time (hours): How long your team needs to get an order ready. For example, with 24 hours, an order placed on Thursday morning can be collected on Friday at the earliest.
- Collections per day: The most collections the location accepts each day. Leave it at 0 for no limit.
- Closed dates: Days the location is closed, in YYYY-MM-DD format.
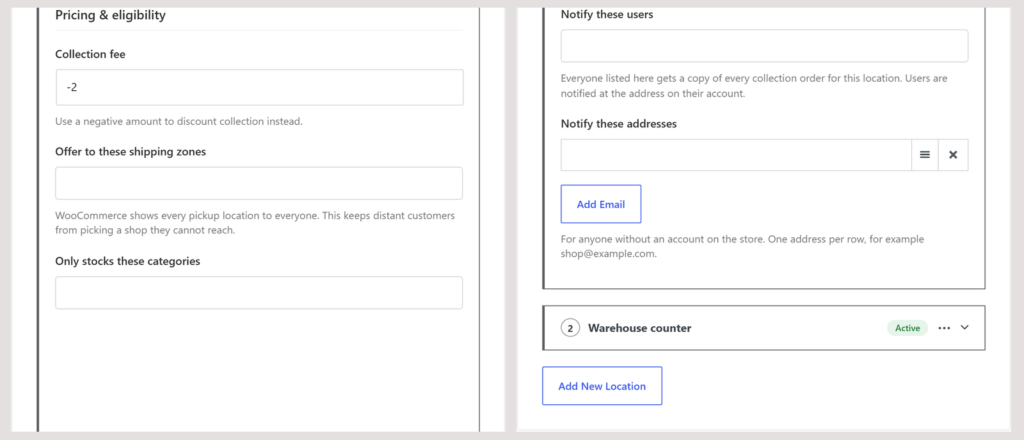
Finally, set the location’s fee and who can use it:
- Collection fee: An amount added when customers collect from this location. Enter a negative number, such as -2, to give a discount instead.
- Offer to these shipping zones: Shows the location only to customers in the zones you select.
- Only stocks these categories: Shows the location only for products in the categories you select.
- Notify these users and Notify these addresses: The staff who get an email about new collection orders for this location.
Click Save once you’ve added your locations.
Customizing the Checkout Display
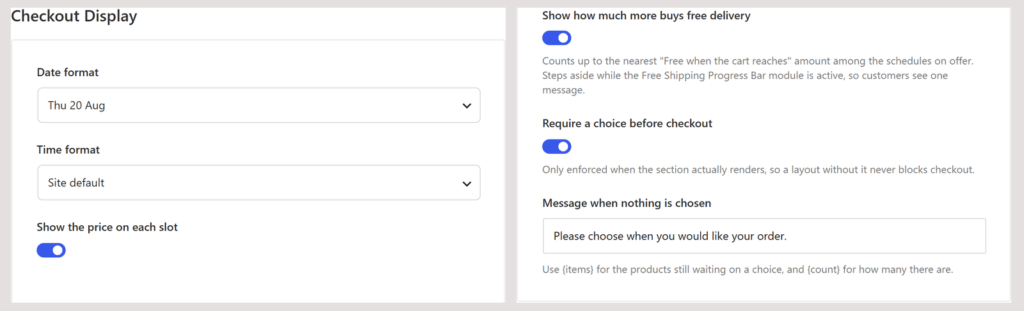
The Checkout Display section controls how the options look at checkout:
- Date format and Time format: How dates and times appear, such as Thu 20 Aug and 2:00 pm. Site default uses your WordPress settings.
- Show the price on each slot: Shows the fee for each service and the fee or discount for each pickup location in the checkout dropdowns.
- Show how much more buys free delivery: Shows a message such as “Add $15.00 more for free delivery.” This message is hidden while the Free Shipping Progress Bar module is active.
- Require a choice before checkout: Stops customers from placing an order until every product has a delivery or collection choice. Edit the error message in Message when nothing is chosen.
Adding Booking Details to Order Emails
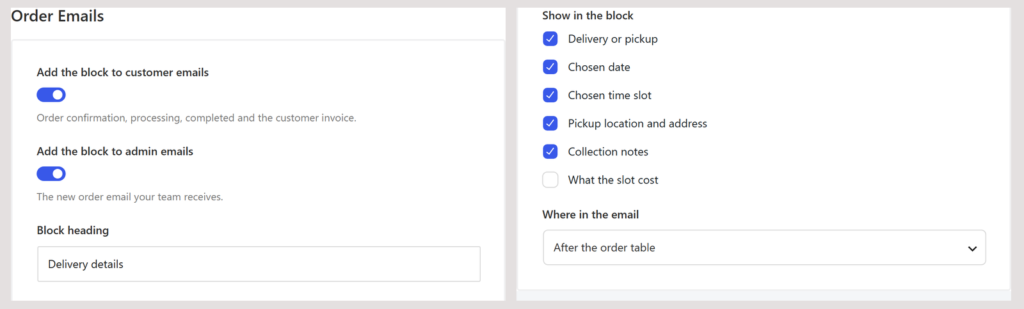
The Order Emails section adds a Delivery details block to WooCommerce’s order emails:
- Add the block to customer emails and Add the block to admin emails: Choose whether the block appears in the emails your customers and your team receive.
- Block heading: The title shown above the block.
- Show in the block: The details to include. The options are Delivery or pickup, Chosen date, Chosen time slot, Pickup location and address, Collection notes, and What the slot cost.
- Where in the email: Place the block Before the order table, After the order table, or After the customer details.
Setting Up Customer Notifications
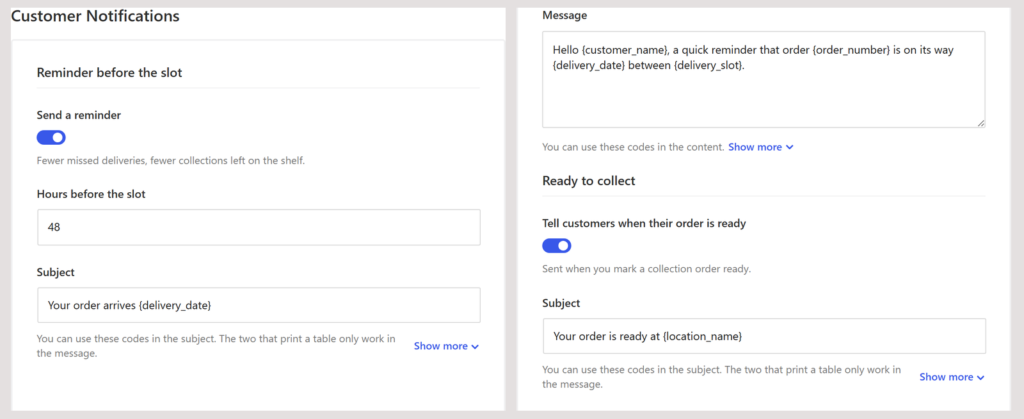
The Customer Notifications section controls the booking emails Merchant Pro sends:
- Send a reminder: Emails customers before their booking. Set how early in Hours before the slot.
- Tell customers when their order is ready: Emails customers when their collection order is ready. To send it, open the order, choose Send “ready to collect” email from the Order actions dropdown, and click Update.
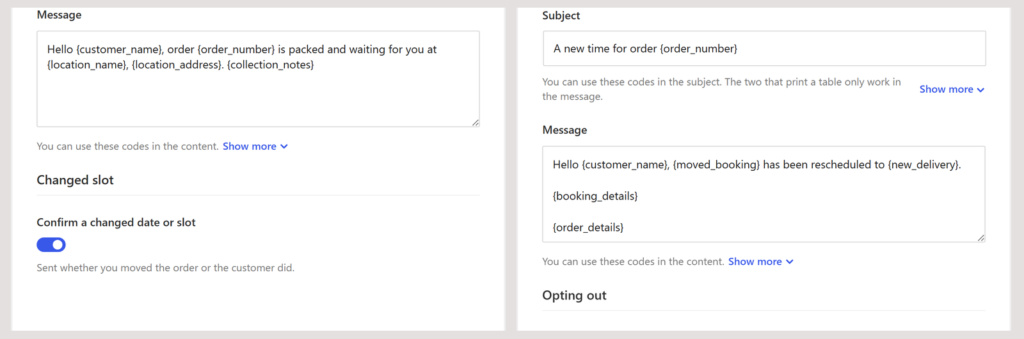
- Confirm a changed date or slot: Emails customers when their booking moves to a new day or time.
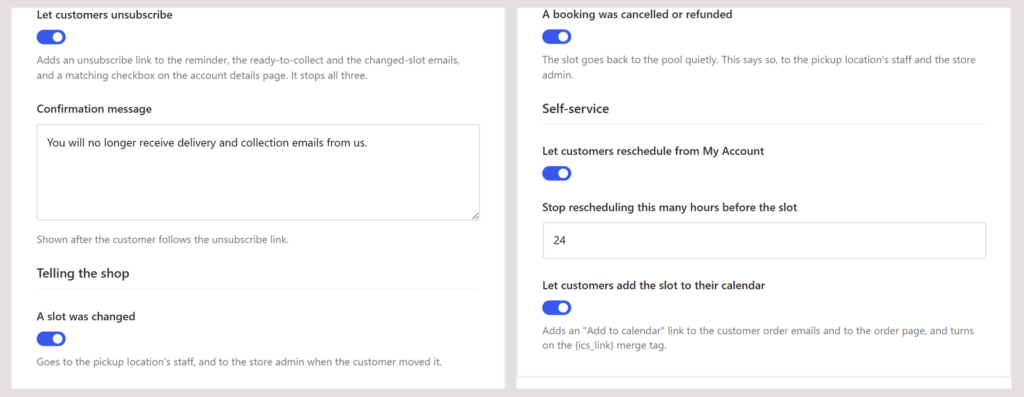
- Let customers unsubscribe: Adds an Unsubscribe link to these emails.
- A slot was changed and A booking was cancelled or refunded: Email your pickup location’s staff and the store admin about these changes.
Each customer email has its own Subject and Message. To add booking details, use merge tags such as {customer_name}, {delivery_date}, and {delivery_slot}. Click Show more below a field to see all the tags you can use.
At the bottom of the section, two options let customers manage their own bookings:
- Let customers reschedule from My Account: Logged-in customers pick a new day and time from their order page. Use Stop rescheduling this many hours before the slot to set a deadline.
- Let customers add the slot to their calendar: Adds an Add to calendar link to the order page and the customer emails.
Configuring Orders and Operations
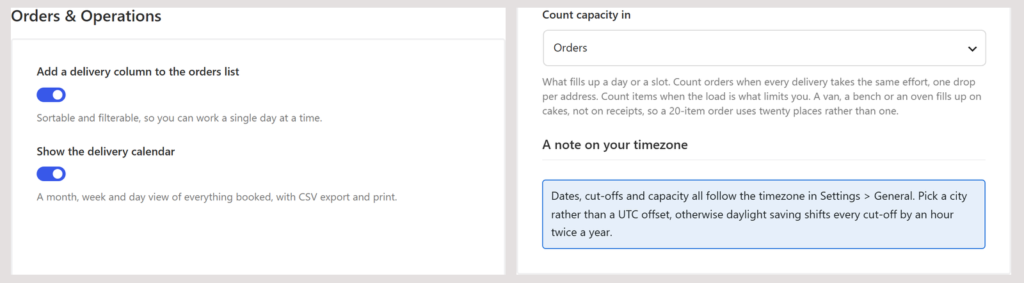
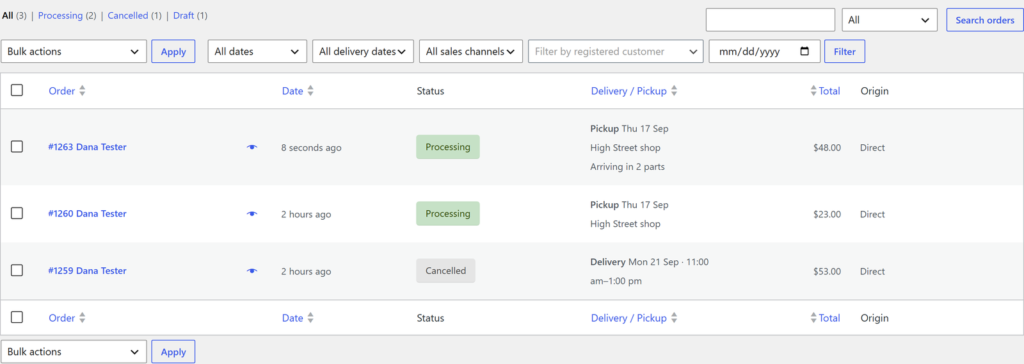
- Add a delivery column to the orders list: Adds a Delivery / Pickup column to WooCommerce » Orders.
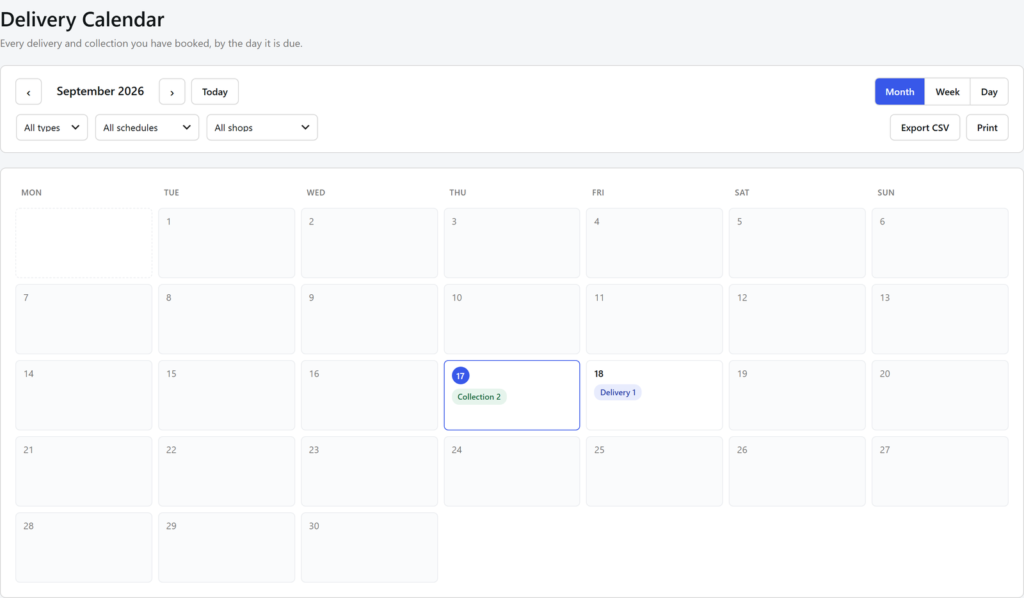
- Show the delivery calendar: Adds a Delivery Calendar page under the WooCommerce menu.
- Count capacity in: Choose Orders to count each order as one booking, or Items to count each item. With Items, a 20-item order uses 20 places.
Note: Dates, cut-off times, and limits follow the timezone in Settings » General. Choose a city there instead of a UTC offset, so daylight saving time doesn’t shift your cut-off times. For details, see WordPress’s guide to setting your site’s timezone.
Click Save to store all your settings.
Viewing Delivery and Pickup Options at Checkout
At checkout, each product in the order summary gets its own choice. Customers pick Delivery or Collection, then the service, the pickup location, the day, and the time.
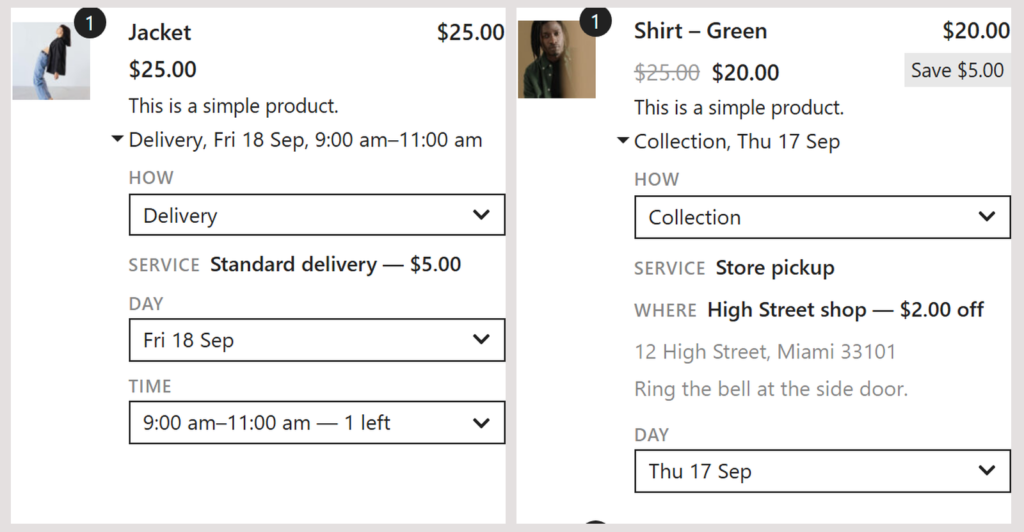
When customers choose differently for different products, the order arrives in parts, and each part gets its own fee. If every product is collected, Merchant Pro removes the shipping cost.
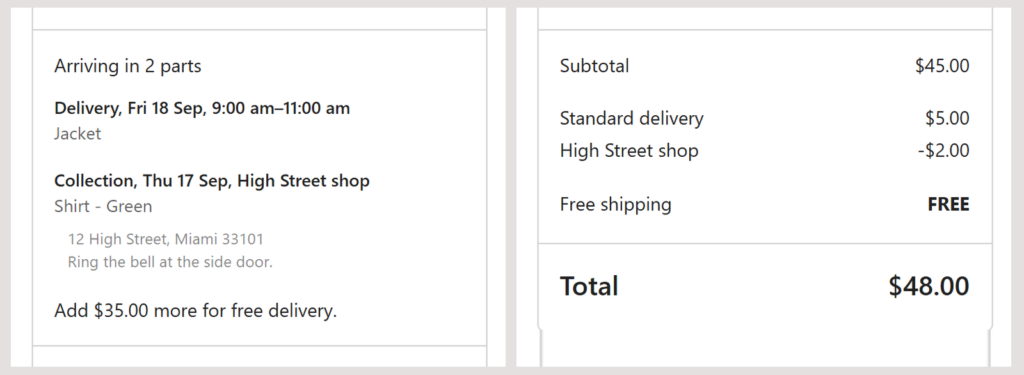
After checkout, customers see their booking on the order confirmation page and in their order emails.
Managing Deliveries and Collections
Viewing Bookings in the Orders List
Go to WooCommerce » Orders to see each order’s booking in the Delivery / Pickup column. To see the orders for a certain day, use the All delivery dates dropdown and choose Today, Tomorrow, This week, or Next 7 days. To see one exact date, pick it in the date field instead.
Using the Delivery Calendar
Go to WooCommerce » Delivery Calendar to see your bookings in a Month, Week, or Day view. Filter them by type, schedule, or pickup location, and click Export CSV or Print to share the plan with your team.
Changing a Customer’s Booking
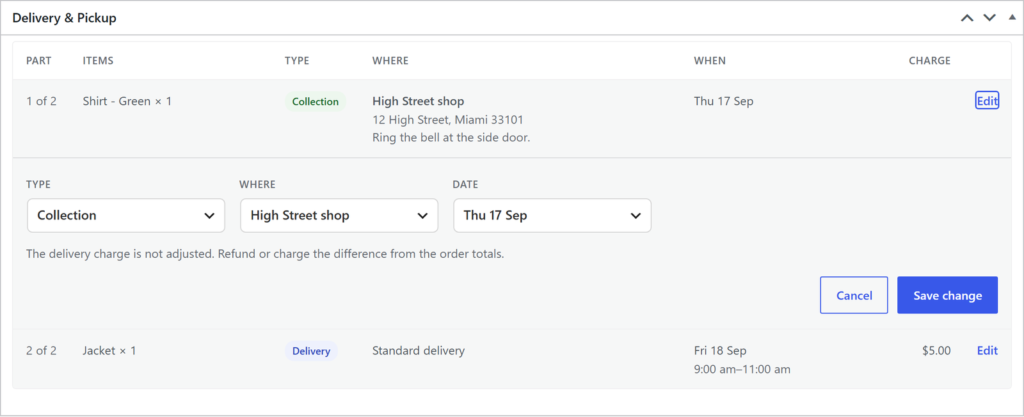
Open the order and scroll to the Delivery & Pickup box below the order items. Click Edit, choose a new date and time, and click Save change. The order total doesn’t change, so refund or charge any difference yourself.
Frequently Asked Questions
Below, we’ve addressed some of the most common questions about the Delivery & Pickup module.
Can I use Delivery & Pickup with the WooCommerce Checkout block?
Yes. The module works with both the classic checkout and the Checkout block. The block needs to be on the page set as your checkout page in WooCommerce » Settings » Advanced.
Why does my checkout show more than one delivery fee?
Each part of an order has its own fee. If a customer picks different days, time slots, or services for different products, each part is charged. When all products share the same choice, the customer pays one fee.
Why can’t my customers select today’s date?
Check the schedule’s Lead time, since a lead time of 1 day or more hides today. Then make sure Allow same-day is turned on and the Daily cut-off time hasn’t passed. For pickup, the location’s Preparation time (hours) also applies.
What happens to a booked slot when I cancel an order?
The slot becomes free for other customers. This also happens when an order is refunded, moved to the trash, or its payment fails. Unpaid orders placed with online payment methods give their slot back after one hour.
That’s it! You can now offer delivery dates, time slots, and pickup locations at checkout with the Delivery & Pickup module in Merchant Pro.
Next, would you like to show customers how close they are to free shipping? Check out our guide on the Free Shipping Bar module to learn more.
