Would you like to manage your store just by chatting with an AI assistant? Merchant’s AI Abilities feature lets assistants like Claude, ChatGPT, and Cursor read and manage parts of your WooCommerce store directly: turning modules on and off, building and editing campaigns, reading your analytics, and updating product settings. Instead of clicking through the WordPress dashboard yourself, you describe what you want in plain language, and your assistant makes the change for you.
In this guide, we’ll walk you through what your assistant can do in Merchant, how to connect it, how the safety controls work, and example prompts for every module.
Requirements:
- Your site must be running WordPress 6.9 or later, which includes the WordPress Abilities API. On older versions, the free Vibe AI plugin adds the required support.
- The Merchant plugin installed and activated, version 2.3.0 or later. If you’re using Merchant Pro, you’ll need version 2.3.0 or later.
- WooCommerce installed and active. Merchant’s AI features build on top of it.
- The free Vibe AI plugin, to connect assistants like Claude, ChatGPT, or Cursor. We’ll cover installing it below.
What AI assistants can do in Merchant
Once connected, your assistant works through a fixed set of well-defined actions, and it never gets free-form access to your database or files. Here’s what it can reach:
| Area | What it covers |
|---|---|
| Modules | See which Merchant modules exist, turn them on or off, and read and change their settings |
| Campaigns | List, create, update, and delete campaigns (offers, bars, popups, and so on) inside a module |
| Analytics & recommendations | Read your Merchant analytics and get optimization suggestions |
| Per-product settings | Read and update pre-order and add-to-cart text settings on a specific product |
| Bundles, size charts, swatches, etc. | List, create, update, and delete bundle, size chart, etc. |
Enabling AI Abilities
Log in to your WordPress admin area, go to Merchant, and open the Settings tab. This page is your home base for everything AI in Merchant: it includes a one-click button to install the WPVibe plugin and the toggle that controls write access.
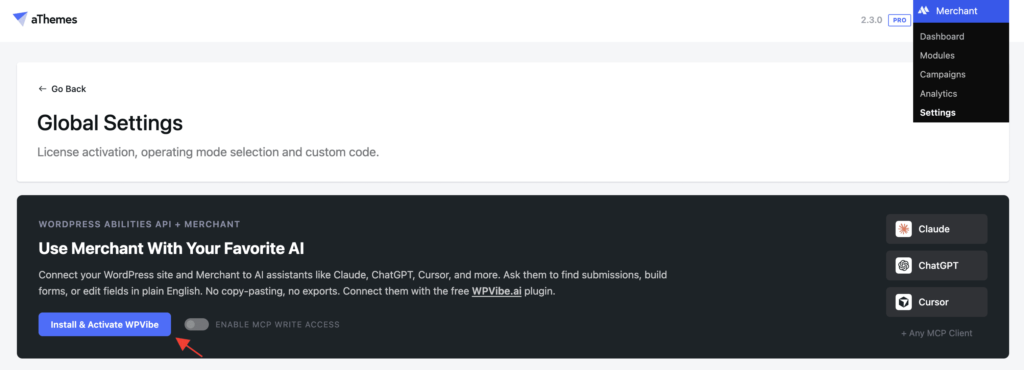
To connect assistants like Claude, ChatGPT, or Cursor to your site, you’ll need the free Vibe AI plugin. It exposes Merchant’s abilities over MCP, the open standard AI assistants use to connect to external tools. (Merchant itself only defines the abilities; WPVibe is what makes them reachable from outside your site.)
WPVibe is a free plugin by SeedProd that connects your WordPress site to AI assistants over MCP. Merchant handles the installation for you. Just click the Install & Activate WPVibe button.
Connecting your AI assistant
Next, go to WPVibe in your admin sidebar. This page walks you through the connection in three short steps.
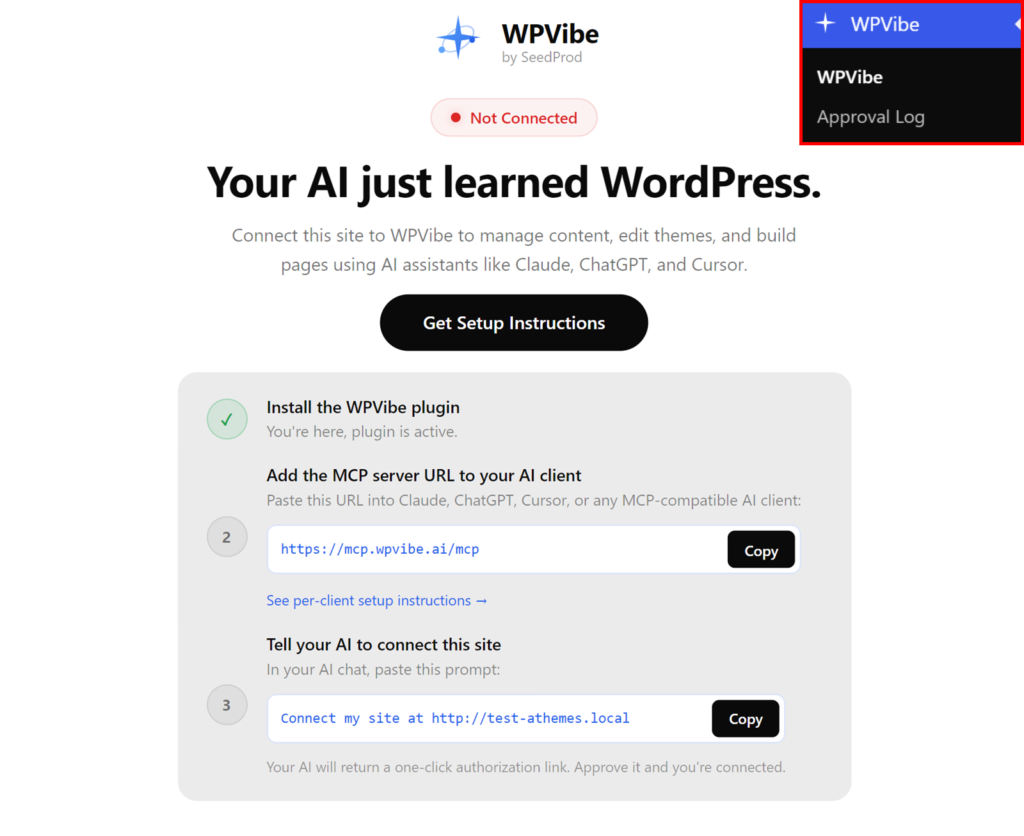
First, copy the MCP server URL shown on the page:
https://mcp.wpvibe.ai/mcp
Then add it to your AI client:
- Claude (web): Go to Settings » Connectors, click Add custom connector, and paste the URL.
- Claude Desktop: Go to Settings » MCP and add a remote server with the URL. For full details, see Anthropic’s custom connectors guide.
- ChatGPT: Add the official WPVibe app from ChatGPT’s app directory and click Connect. Apps attach per conversation, so in any new chat, click the + button in the message box and choose WPVibe. See OpenAI’s developer mode and MCP guide for the current steps.
- Cursor: Open the MCP section in Cursor’s settings and add a remote server with the URL. See Cursor’s MCP documentation for full details.
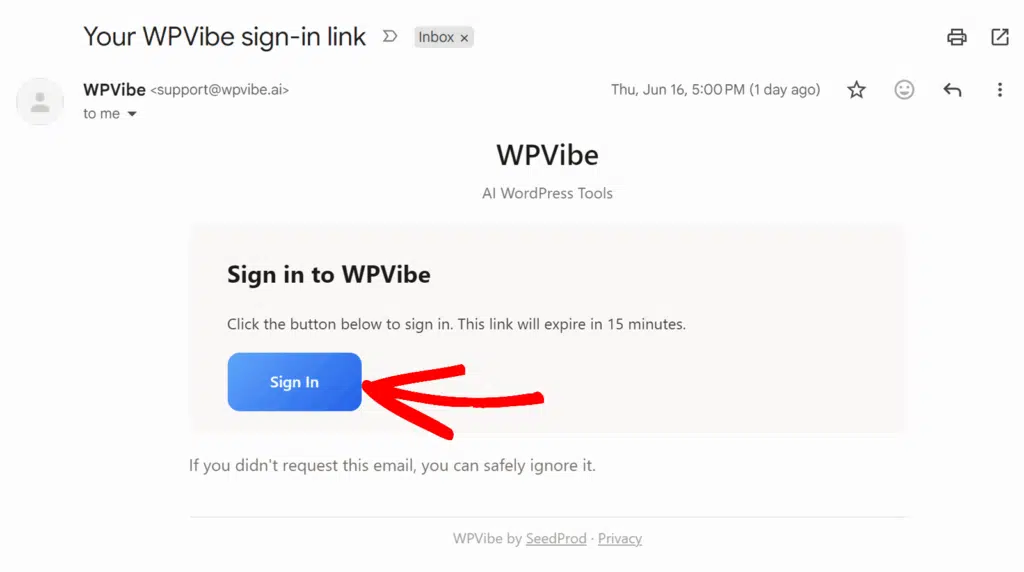
When you add the connector, WPVibe asks you to sign in with your email address. You’ll receive an email with a sign-in button that’s valid for 15 minutes. No password is needed, and your site credentials are never shared in the chat.
Finally, paste this prompt into your AI chat, replacing the URL with your own site’s address:
Connect my site at https://example.com
Your assistant will reply with an authorization link. Click it to open the approval page in your browser, then confirm that you want to give your assistant access to the site. Once you’ve confirmed, your site is connected and you’re ready to start prompting.
Turning on AI edits
Merchant keeps reading and changing separate. As soon as your assistant is connected, it can read information (list your modules, show campaign settings, pull analytics) because looking things up can’t change your store.
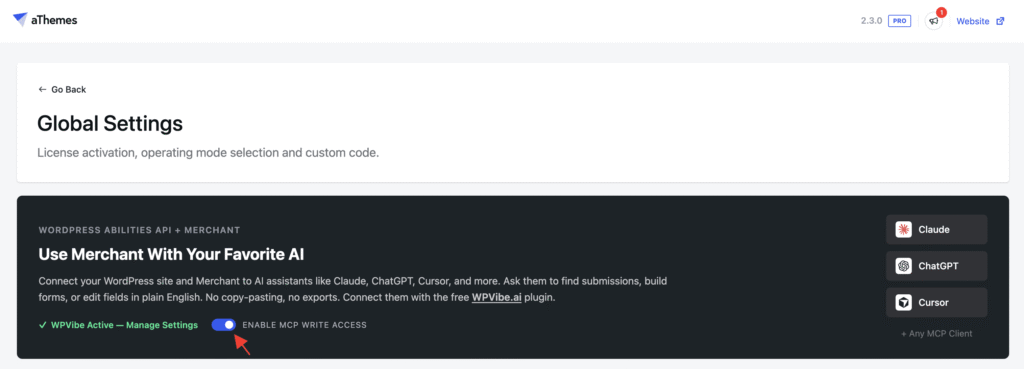
To let an assistant make changes (create or edit campaigns, toggle modules, update product settings, and so on), you flip a single write-access switch in Merchant’s Global Settings. This one toggle controls whether an assistant can change anything at all. Leave it off and every create, update, or delete action is blocked, no matter which assistant asks or how it’s phrased; read-only lookups still work. Turn it on when you’re ready, and switch it back off any time.
Trying example prompts
You’re all set. Copy any prompt below into your AI chat, or use them as a starting point for your own requests.
Tip: Start your session by telling your assistant to look up what Merchant can do. For example:
We'll use Merchant's abilities for this session. Please discover them and use them for the tasks I give you.You’ll get more reliable results if you mention the ability name in your prompt.
Quick start
One prompt can activate a module, build a campaign inside it, and report back on performance in a single request:
- Turn on the Free Shipping Bar module, create a bar that offers free shipping on orders over $50, then show me its conversion analytics.
Managing modules and reading your data
These work across your whole store, no matter which modules you run:
- List modules: List every Merchant module and tell me which ones are turned off.
- Toggle a module: Turn on the Frequently Bought Together module. (Requires Administrator access.)
- Read analytics: What’s my Free Shipping Bar conversion rate this month?
- Get recommendations: Give me optimization recommendations based on my current analytics. Which campaign should I improve first, and why?
Prompts by feature
Each Merchant module has its own “Try with AI” prompts, grouped below by what they do.
Promotions and discounts
Buy Now: Launch a Buy Now campaign scoped to a category, and customize the button’s text, icon, and post-purchase redirect.
- Create a Buy Now campaign called Summer Rush that shows the button on the Summer Essentials category
- Change the Summer Rush Buy Now campaign’s button text to “Checkout Now” and show the lightning icon before it
- Set the Summer Rush Buy Now campaign to clear the existing cart before adding the product and redirect shoppers to a custom URL after purchase
- Exclude the Beach Towel product from the Summer Rush Buy Now campaign
Buy X, Get Y: Launch a new deal or adjust one already running.
- Create a Buy 2 Get 1 Free campaign for the Summer Tees category that runs through the end of the month
- Set up a Buy 1 Get 1 at 50% off deal for our Winter Jackets collection, capped at 3 free items per order
- Update the button text on the Summer Tees Buy X Get Y campaign to “Add My Free Item”
- Limit the Buy 3 Get 1 Free campaign to only the Clearance category
Free Gifts: Reward a spending goal or tie a gift to a coupon code.
- Create a free-gift offer that gives away a Travel Mug when a customer spends over $100
- Set up a coupon-based free-gift offer that adds a Travel Mug once a shopper applies the WELCOME10 coupon
- Update the goal-reached message on the Travel Mug free-gift offer to “Congrats, your free Travel Mug is unlocked!”
- Limit the Travel Mug free-gift offer so the gift is only claimable on purchases from the Drinkware category
Storewide Sale: Discount your whole store or scope one to a category or set of products.
- Create a Summer Clearance storewide sale taking 20% off all products through the end of the month
- Set up a fixed $15 off storewide sale for the Outdoor Furniture category instead of a percentage
- Create a storewide sale that takes 10% off the sale price of just the Trail Runner Sneakers and Hiking Boots
- Update the Summer Clearance storewide sale to exclude any products that are already on sale
Bulk Discounts: Launch a quantity discount and fine-tune its tiers or copy.
- Create a bulk discount that takes 10% off the Coffee Beans category when a customer buys 5 or more
- Set up a bulk discount that takes a flat $15 off the regular price once the cart holds 10 or more items
- Change the tier format text on the Coffee Beans bulk discount to “Buy {quantity}, save {discount} off each”
- Exclude any products already on sale from the Coffee Beans bulk discount
Spending Discount Goal: Set the target and reward, and tailor the progress message and who qualifies.
- Set the spending goal to $150 based on the cart subtotal, giving shoppers a 10% discount called “Loyalty Bonus” when they reach it
- Switch the Loyalty Bonus reward to a fixed $20 off based on the cart total instead of a percentage
- Change the Loyalty Bonus in-progress message to “Only {spending_goal} more to unlock your bonus!”
- Limit the Loyalty Bonus spending goal to customers with the Wholesale role
Pre-Orders: Launch a campaign or adjust the discount, shipping date, or button text on one already running.
- Create a pre-order for the Galaxy Pro Headphones with an expected shipping date of March 15, 2026
- Set up a pre-order for the entire Spring Collection category with a fixed $10 discount instead of a percentage
- Change the button text on the Galaxy Pro Headphones pre-order to “Reserve Yours”
- Exclude the Wired Earbuds product from the Spring Collection pre-order
Countdown Timer: Set when the sale ends and restyle how the timer looks.
- Switch the countdown timer to sale-price dates and set it to end at midnight on November 30 for our Black Friday sale
- Switch the countdown timer to an evergreen timer that gives each visitor a fresh 24-hour deadline
- Change the sale-ending message above the countdown timer to “Black Friday ends in” and center it
- Switch the countdown timer to the Circles layout with red digits
Cross-sells and bundles
Complementary Products: Create an offer or adjust its discount or placement.
- Create a complementary offer that suggests a Yoga Block and Resistance Band alongside the Yoga Mat, at 10% off the bundle
- Set up a complementary offer for the Camping category that adds a Headlamp and Water Filter, with the cheapest item free
- Change the offer title on the Yoga Mat complementary offer to “Complete Your Home Studio” and move it to show after the product summary
- Run a complementary offer across all products but exclude anything in the Clearance category
Frequently Bought Together: Create a bundle or fine-tune the discount or copy on an existing offer.
- Create a Frequently Bought Together bundle for the Wireless Earbuds product that also includes the Charging Case and Carrying Pouch, at a 10% discount
- Set up a Frequently Bought Together bundle for the Skincare category with a fixed $5 discount applied to the regular price
- Update the bundle title on the Wireless Earbuds product page to “Complete the Look”
- Limit the Skincare Frequently Bought Together bundle to exclude any products that are already on sale
Product Bundles: Create a bundle or adjust its pricing or how bundled products display.
- Create a Home Office Product Bundle from the Standing Desk, Ergonomic Chair, and Desk Lamp at 15% off the bundle total
- Set up a Starter Fitness Product Bundle priced at a fixed $49 for the whole set instead of a percentage discount
- Add a Monitor Stand to the Home Office Product Bundle and switch it to a per-item discount
- Change the Home Office Product Bundle’s price display to show a subtotal instead of the price per unit
Added To Cart Popup (added-to-cart-popup): Choose what shows inside the popup and control where it appears.
- Turn on suggested products in the added-to-cart popup, set their source to Recently Viewed Products, and show a short product description next to the thumbnail
- Change the added-to-cart popup’s message to “Great choice, it’s in your cart!” and rename the continue-shopping button to “Keep Browsing”
- Show the added-to-cart popup only on single product pages and only on desktop
- Stop the added-to-cart popup from appearing for any product in the Gift Cards category
Side Cart: Choose which pages it slides open on and set up product upsells inside it.
- Make the side cart slide open from the left and show it after adding a product from the single product page
- Set up a side cart upsell that recommends our Wool Beanie whenever a Winter Jacket is added to the cart
- Change the upsell heading to “Complete your look” and limit the side cart to 3 upsell suggestions
- Turn on the side cart’s floating cart icon and move it to the left side of the screen
Cart and checkout
Checkouts: Switch between the Shopify-style, one-step, and multi-step layouts, and keep order totals sticky.
- Switch my checkout to the one-step layout
- Change the checkout to the multi-step layout instead
- Switch to the Shopify-style layout and keep the order totals box sticky as shoppers scroll
Clear Cart: Control where the button appears and when it prompts shoppers to empty their cart.
- Turn on Clear Cart and show the button on the cart page after the coupon field
- Change the Clear Cart button label to “Empty My Cart” and update its confirmation message
- Only show the Clear Cart button once the cart has at least 3 items
- Prompt shoppers to clear their cart after 12 hours of inactivity
Cart Reserved Timer: Set how long items stay reserved and whether the cart clears when time runs out.
- Set the cart reservation timer to reserve items for 15 minutes
- Have the cart reservation timer clear the cart when it expires instead of just hiding it
- Change the reserved-cart message to “Only a few left, your items are held for a limited time”
- Switch the reservation timer’s icon to the hourglass and set its background color to a soft red
Agree to Terms Checkbox: Require shoppers to accept your terms before checkout, and reword and link the checkbox.
- Require customers to agree to my Terms & Conditions before they can place an order
- Change the checkbox to read “I have read and accept the” followed by a “Purchase Agreement” link
- Point the terms and conditions link to my Terms of Service page
Google Address Autocomplete: Switch it on and connect your Google Places API key.
- Turn on Google address autocomplete at checkout
- Add my Google Places API key so the address autocomplete starts suggesting addresses
- Set the address autocomplete’s optional API URL parameters to region=us and language=en
Payment Logos: Pick which cards and wallets display and where they appear.
- Show the Visa, Mastercard, and PayPal logos from the built-in icon library on my product pages
- Also show the payment logos on the cart page, right before the “Proceed to checkout” button
- Change the text above the payment logos to “Guaranteed Safe Checkout” and center them
- Hide the payment logos on all products in the Gift Cards category
Urgency & social proof
Free Shipping Bar: Rewrite the messages shoppers see and change where the bar appears and how it looks.
- Reword the free shipping bar’s in-progress message to “Only {amount_left} left to unlock free shipping!”
- Move the free shipping bar to the top of the page and set it to stay sticky as shoppers scroll
- Apply the Ocean Breeze template to the free shipping bar and bump its font size up to 20px
- Show the free shipping bar only to the Wholesale Customer role
Stock Scarcity: Set the stock threshold that triggers the low-stock box, and reword and restyle it.
- Show the low-stock urgency box only once a product drops below 5 units in stock
- Reword the low-stock message to “Almost gone, only {stock} left in stock”
- Show the urgency box on shop and category archive pages too, not just the single product page
- Restyle the low-stock progress bar with a green-to-red gradient and bump the message font size up to 18px
Recent Sales Notifications: Choose which activity they show and how far back they look.
- Turn on the recent purchase notifications and only show orders from the last 24 hours
- Set the sales count notification to only appear once a product has at least 10 purchases in the past week
- Switch the customer name format to first name plus initial and hide product names in the notifications
- Exclude the Wireless Earbuds product so it never triggers a notification
Advanced Reviews: Turn on photo uploads and an images carousel, and reward reviews with a discount.
- Turn on photo reviews and let shoppers upload up to 4 photos with each review
- Enable the review images carousel and show 4 images per slide
- Offer a 10% discount for leaving a review and have the code expire after 30 days
- Send an automated review-request email 5 days after an order is completed
Trust Badges: Choose which badges appear on product pages and restyle the heading and layout.
- Show all three built-in trust badges on my product pages
- Change the text above the trust badges from “Product Quality Guaranteed!” to “Shop With Confidence”
- Left-align the trust badges and set the heading font size to 18px
- Cap the trust badge images at 60px wide and 60px tall
Reasons To Buy List: Build a list of selling points and choose which products it shows on.
- Create a reasons-to-buy list titled “Why shop with us” with the items “Free returns within 30 days,” “Ships within 24 hours,” and “2-year warranty included”
- Add “Handmade in Italy” to the “Why shop with us” list
- Show the “Why shop with us” list only on products in the Leather Goods category
- Exclude the Clearance tag from the “Why shop with us” list
Product-page enhancements
Add To Cart Text: Relabel the button by product type and stock status, or override it per product.
- Change the “Add to Cart” button on simple products to “Buy Now” across the shop
- Change the “Add to Cart” button on variable products to say “Choose Options” on the single product page
- Show “Sold Out” on the button for out-of-stock products
- Override the “Add to Cart” text on the Vintage Leather Wallet to “Grab Yours”
Animated Add to Cart: Choose the animation style and when it plays.
- Set the add-to-cart button animation to Bounce
- Switch the add-to-cart animation to Pulse instead
- Use the Tada animation on the add-to-cart button and play it on page load instead of mouse hover
Sticky Add To Cart: Change where the bar sits, what it shows, and where it’s hidden.
- Move the sticky add-to-cart bar to the top of the page and have it appear after 300px of scrolling
- Hide the product image and quantity selector so the bar shows just the title, price, and add-to-cart button
- Show the sticky add-to-cart bar on mobile and tablet only
- Stop the sticky add-to-cart bar from showing on any product in the Clearance category
Quick View: Restyle the button and rearrange what shows inside the modal.
- Set the Quick View button to show an icon and text, label it “View Details,” and use the cart icon
- Overlay the Quick View button (labeled View Details) on the product image, positioned 20% from the top and 80% from the left
- Widen the quick view modal to 1200px, move the gallery thumbnails to the bottom, and show the full product description
- Enable ajax add to cart in the quick view popup and hide the quantity selector
Product Labels: Create a label and fine-tune its look and which products it appears on.
- Create a “Best Seller” text label and show it on all featured products
- Change the Best Seller label’s background color to a bright red and make its text bold
- Update the Best Seller label so it only appears on products in the Coffee Beans category
- Exclude the Decaf Blend product from the Best Seller label
Product Navigation Links: Turn on next/previous links and control how they look and point.
- Turn on Product Navigation Links so next and previous links appear on single product pages
- Set the navigation mode to Category so the links only move between products in the same category
- Switch the navigation text to show full product titles instead of the generic “Previous” and “Next” labels
- Move the product navigation links to after the product summary and underline the text
Variation Swatches: Style how swatches display, and set the color or image for a specific attribute term.
- Set the color swatch for the Red term of the Color attribute to
#C0392B - Give the Blue term of the Color attribute a gradient swatch blending
#2980B9into#6DD5FA - Turn on the tooltip so each swatch shows its name when shoppers hover over it
- Make the color swatches circular and increase their size to 40px
Size Chart: Build a chart and assign it to the right products and categories.
- Create a Footwear size chart with US, EU, and UK columns covering shoe sizes 5 through 12
- Add a Women’s Sizing tab to the Footwear size chart and a short fit-guide description below it
- Assign the Footwear size chart to every product in the Shoes category
- Change the size chart button label from “Size Chart” to “Find My Fit”
Product media
Product Audio: Set a featured track, build an audio gallery, or switch on autoplay.
- Set the featured audio on the Midnight Jazz Vinyl product so it plays in place of the featured image on the shop and archive pages
- Add an audio gallery to the Midnight Jazz Vinyl product with a few preview tracks and position it before the image gallery
- Turn on autoplay so the audio player starts on its own for shoppers
- Enable the shortcode option so I can place the player manually with [merchant_module_product_audio]
Product Video: Add a video to a product and adjust autoplay and aspect ratio store-wide.
- Set the Aurora Yoga Mat’s product video to a YouTube demo URL
- Turn on autoplay so product videos start playing automatically
- Change the product video aspect ratio to 9:16 for vertical clips
- Enable the shortcode option so I can place the product video with a shortcode in my page builder
Product Brand Image: Set a store-wide image, adjust its size and spacing, or give a product its own.
- Set the store-wide brand image that shows on all my products
- Cap the brand image at 200px wide and 120px tall
- Add 30px of spacing above the brand image and 10px below
- Set a different brand image on the Organic Cotton Tee product
Storefront and navigation
Real-Time Search: Set how many results appear and how they’re sorted, and let shoppers search by SKU.
- Show up to 8 products in the real-time search results
- Sort the search results by price from highest to lowest
- Let shoppers search by SKU as well as product name
- Also list matching product categories in the results and widen the results box to 600px
Recently Viewed Products: Control where they appear, how many show, and the grid layout.
- Show the last 8 recently viewed products in a 4-column grid
- Also display the recently viewed products on the cart and checkout pages
- Switch the recently viewed products to a slider layout with the navigation arrows always visible
- Change the heading to “Recently Browsed” and show it as an H3
Scroll to Top Button: Reposition and restyle it, show a text label, or limit it to mobile.
- Move the scroll-to-top button to the left side of the page
- Switch the scroll-to-top button to the outline style with a dark gray border
- Show a “Back to top” text label next to the button’s icon
- Only show the scroll-to-top button on mobile devices
Quick Social Links: Add a platform icon, restyle the bar, and choose where it appears.
- Add our Instagram link to the quick social links
- Move the quick social links to the right side of the screen and show them on mobile and tablet only
- Set the icon color to white on a dark background and increase the corner rounding
- Only show the social links on single product pages and hide them on the cart and checkout
Login Popup: Word the login link and welcome message, and resize and restyle the popup.
- Change the login popup link text to “Sign In or Register”
- Turn off the login popup welcome message shown to logged-in users
- Set the welcome message to “Hi {display_name}, welcome back!”
- Set the popup’s width to 500px and change its background color to white
Cookie Banner: Reword the message, switch its placement, and link it to your privacy policy.
- Reword the cookie banner message to explain that we only use cookies to improve the shopping experience
- Move the cookie banner to the fixed bottom position instead of floating
- Point the banner’s “Learn More” link at our privacy policy page
- Change the accept button to say “Got it” and remember the choice for 30 days
Auto External Links: Open external links in a new tab, or turn that back off.
- Turn on Auto External Links so every external link opens in a new browser tab
- Turn Auto External Links back off so external links open in the same tab
Cart Count Favicon: Restyle the badge’s shape, corner, and colors, and change how it animates.
- Make the cart count badge a rectangle pinned to the top-left corner of the tab
- Give the cart count badge white text on a dark blue background
- Set the badge to pop whenever the cart count changes
- Repeat the badge’s animation every 3 seconds instead of playing it just once
Inactive Tab Message: Tailor the text shown when shoppers switch away, swap the favicon, and rotate messages.
- Set the cart-items tab message to “You left {cart_count} items behind”
- Show a high-value cart message when the cart total goes over $150
- Change the browser favicon to the cart emoji while the tab is inactive
- Turn on rotating tab messages that cycle every 5 seconds
Customer capture
Waitlist: Word the sign-up form and restock emails, and review or prune subscribers.
- Show me everyone currently on the waitlist for the Midnight Runner Sneakers
- Reword the back-in-stock email to open with “Good news, your {product} is available again”
- Turn on automatic restock emails so subscribers are notified the moment an item is back in stock
- Clear out everyone who already unsubscribed from the Midnight Runner Sneakers waitlist
Wishlist: Choose where the button appears and set up social sharing.
- Display the wishlist products on the cart page and show 8 items in the grid
- Switch the wishlist button to the second heart icon and change the tooltip text to “Save for later”
- Turn on wishlist sharing and add Facebook, WhatsApp, and Pinterest links
- Show the wishlist button only on products in the Accessories category
Frequently asked questions
Below, we’ve answered some of the most common questions about AI Abilities in Merchant.
Do I need the Vibe AI plugin?
Yes. External assistants like Claude, ChatGPT, and Cursor reach your site over MCP, and WPVibe is what exposes Merchant’s abilities over that connection. Without a connector plugin, nothing described here is reachable from outside your site.
Is it safe to give an AI write access?
Write access is off by default and lives behind a single switch you control. Every change runs through WordPress permission checks and the same validation your dashboard uses, so invalid values are rejected before anything is saved. Deletions require naming the exact item (and confirming, for campaigns), and most are recoverable from the trash. You can switch write access back off at any time.
Can an AI assistant see my customers’ personal data or order details?
No. These abilities cover Merchant’s own settings, campaigns, and module data. Merchant doesn’t expose customer records, orders, or payment information through this feature.
Does this work on a local or staging site?
AI assistants connect from the cloud, so your site needs to be reachable from the public internet. Sites on local development environments, behind firewalls, or on private networks won’t be available to your assistant.
Which AI assistants work with this?
Any assistant or tool that supports MCP (the Model Context Protocol): Claude and ChatGPT both do, along with a growing number of AI coding and automation tools.
That’s it! You’ve successfully enabled AI Abilities in Merchant and connected your AI assistant to your site.
