Using Botiga With AI Assistants
Would you like to manage your Botiga store just by chatting with an AI assistant? Botiga’s AI Abilities feature lets assistants like Claude, ChatGPT, and Cursor read and change your theme settings through the WordPress Abilities API. Your assistant can adjust your header, footer, typography, blog, and shop pages, and even import a starter site. You describe what you want in plain language, and your assistant makes the change for you.
In this guide, we’ll walk you through how to enable AI Abilities in Botiga, connect your AI assistant, and try some example prompts.
Requirements:
- Your site must be running WordPress 6.9 or later, which includes the WordPress Abilities API. On WordPress versions older than 6.9, install and activate WPVibe first. It provides the required Abilities API support, after which the AI MCP section becomes available in Botiga.
- The Botiga theme must be installed and activated on your site, version 2.4.8 or later. Botiga Pro is optional. When Botiga Pro is active, its supported settings in the Customizer become available to your assistant automatically.
- WooCommerce must be installed and active if you want your assistant to manage the shop, product, mini cart, and search sections.
- The free WPVibe plugin is required to connect AI assistants like Claude, ChatGPT, or Cursor. We’ll cover installing it below.
What AI assistants can do in Botiga
Once AI Abilities is enabled, your assistant can work with:
- Theme settings: Read and change supported Botiga settings, including site identity, layout, typography, buttons, header, footer, and blog options.
- WooCommerce settings: Adjust your shop archive, product cards, single product pages, mini cart, and search options.
- Starter sites: List the available demo sites and import one. This requires the free aThemes Starter Sites plugin.
Every change goes through the same permission checks, validation, and sanitization the Customizer uses, so updates appear in the Customizer right away and nothing your assistant does is hidden.
Enabling AI Abilities
AI Abilities is turned off by default. To enable it, log in to your WordPress admin area, go to Botiga, open the Settings tab, and select AI MCP.
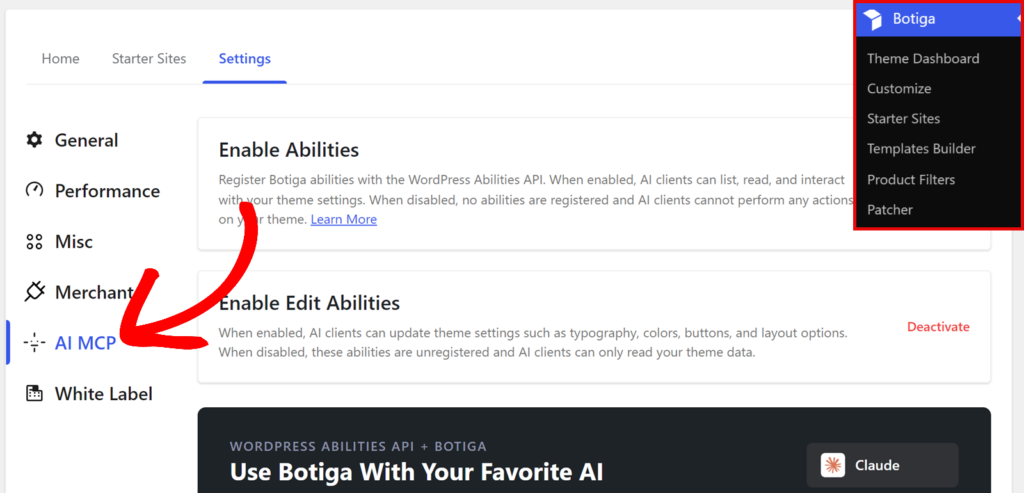
Here you’ll see two settings, both disabled by default:
- Enable Abilities: The master switch. When it’s off, no abilities are registered and AI assistants can’t see or do anything on your theme.
- Enable Edit Abilities: The write switch. When it’s off, AI assistants can only read your theme data. Turn it on to let them update settings such as typography, colors, buttons, and layout options.
Click Activate on each setting you’d like to turn on. Your choice is saved automatically.
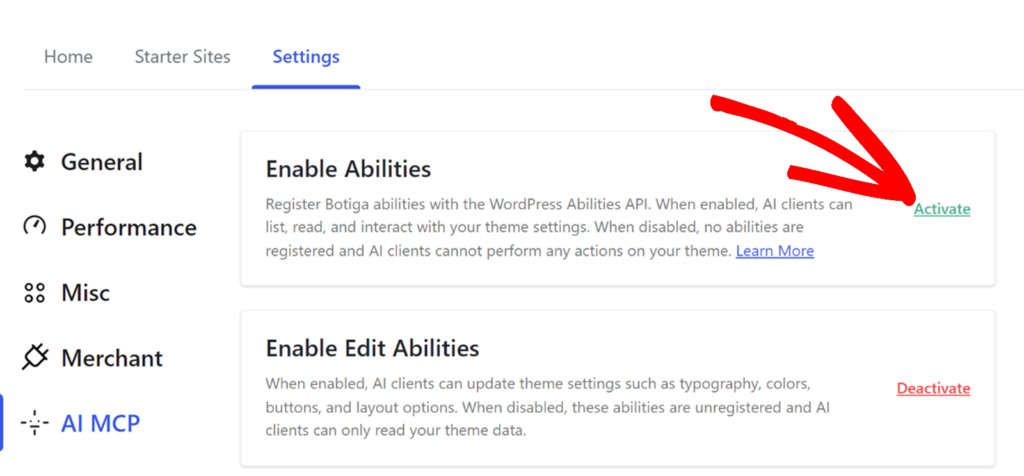
Note: When Enable Edit Abilities is active, authorized AI connections can change Botiga settings when the WordPress user associated with the connection has permission to edit theme options. You can deactivate either setting at any time.
Installing WPVibe
To connect AI assistants like Claude, ChatGPT, or Cursor to your site, you’ll need the free WPVibe plugin. It exposes Botiga’s abilities over MCP, the open standard AI assistants use to connect to external tools.
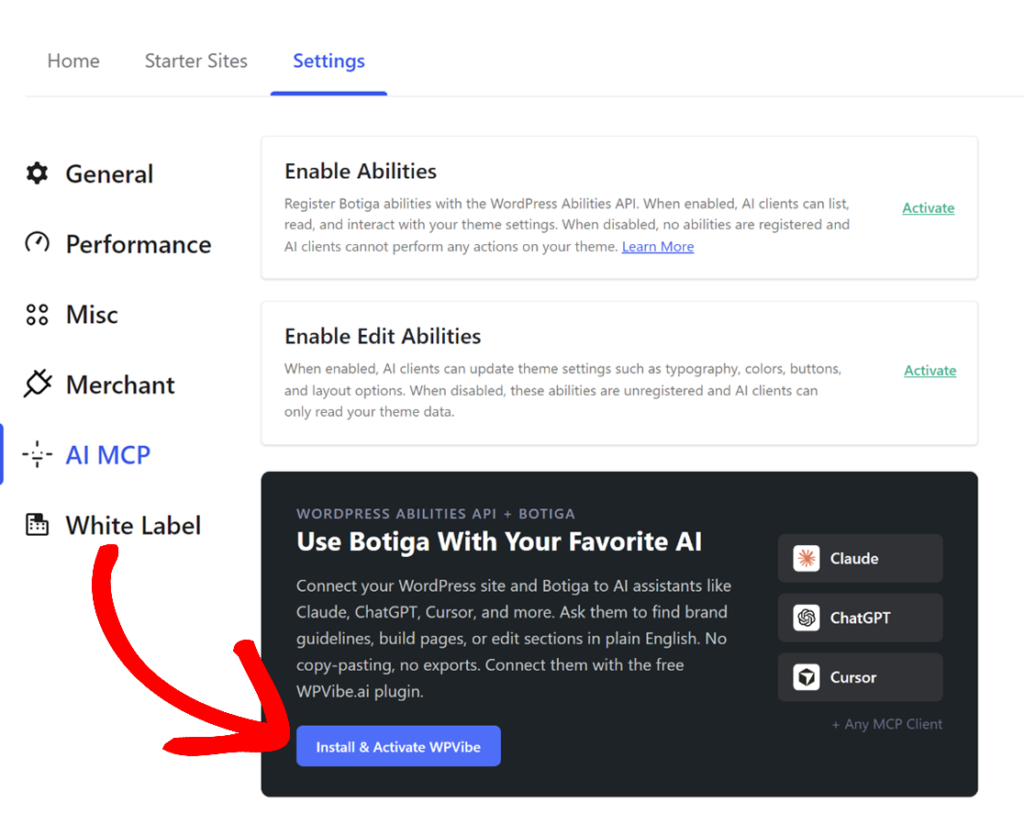
On the same AI MCP screen, click the Install & Activate WPVibe button. The plugin installs and activates in one step, and a new WPVibe item appears in your admin sidebar.
Connecting your AI assistant
Next, go to WPVibe in your admin sidebar. This page walks you through the connection in three short steps.

First, copy the MCP server URL shown on the page:
https://mcp.wpvibe.ai/mcpThen add that URL to your AI client. Every client uses the same URL, but each one labels MCP servers differently, so follow WPVibe’s AI client setup guide for the current steps for Claude, ChatGPT, Cursor, and other MCP clients.
When you add the connector, WPVibe asks you to sign in with your email address. It then emails you a six-digit code, which appears right in the subject line. Type that code on the WPVibe page you left open to finish signing in. No password is needed, and your site credentials are never shared in the chat.
Finally, paste this prompt into your AI chat, replacing the URL with your own site’s address:
Connect my site at https://example.comYour assistant will reply with an authorization link. Click it to open the approval page in your browser, then confirm that you want to give your assistant access to the site. Once you’ve confirmed, your site is connected and you’re ready to start prompting.
Trying example prompts
You’re all set. Copy any prompt below into your AI chat, or use them as a starting point for your own requests.
Tip: Start your session by telling your assistant to look up what Botiga can do. For example: We'll use Botiga's abilities for this session. Please discover them and use them for the tasks I give you.
Botiga routes settings requests through a small set of gateway abilities that cover its sections, so you don’t need to memorize ability names. Naming the area you want to change, like “my product cards” or “my blog archive,” is enough for your assistant to find the right section.
Quick start
One prompt can start the process of taking a fresh site to a working storefront. Your assistant will ask you to confirm the Starter Site import before it proceeds:
- Help me set up my new Botiga store. Import a starter site that suits a fashion shop, make my header sticky, and set my sale badge background to a deep green.
Discovering your site
These prompts use botiga/get-site-capabilities and botiga/list-sections to show what your assistant can reach before it changes anything:
- Which Botiga edition and integrations is my site running?
- List every Botiga section you can configure on my site
- Which of my theme’s sections need Botiga Pro?
Site identity
Reads use botiga/get-section-settings, while writes use botiga/update-setting or botiga/update-section-settings. The same abilities cover every section below:
- Change my site title to Northwind Supply and the tagline to “Outfitters since 1998”
- What’s my current site tagline?
Typography
- Increase the body font size to 17px
- Increase my body line height so paragraphs are easier to read
- Make my post titles 19px on mobile only, and keep the desktop and tablet sizes as they are
Header and footer
Your assistant can read your full header and footer configuration and change its settings. The drag-and-drop builder structures themselves are read-only for safety. Your assistant can inspect the builder structure and change supported header or footer settings, but it cannot rearrange the builder components themselves. To learn more about the builder, see our guide on configuring the header layout in Botiga.
- Make my header sticky
- What’s in my header right now?
- Show the cart icon in my header
- Make my header transparent
Blog pages
- Switch my blog archive to the grid layout
- Hide the page title on my blog archive
- Turn off the sidebar on blog archives
Shop and product pages
- Show me my product card settings
- Change the out of stock badge text to “Sold out”
- Show the discount percentage on sale badges
- Turn off the zoom effect on product images
- Hide the SKU and product tags on single product pages
Mini cart and search
- Open the mini cart automatically when a product is added to the cart
- Turn on the floating cart icon
- Turn on AJAX search results
- Let shoppers search by SKU in the live search
Starter sites
Starter site prompts use the free aThemes Starter Sites plugin. Importing a demo adds pages, products, and settings to your site, so your assistant always asks you to confirm before an import starts. Only import a starter site on a fresh site or one you’re comfortable changing.
- Which Botiga starter sites can I import?
- Import the free starter site that best fits a jewelry store
Frequently asked questions
Below, we’ve answered some of the most common questions about AI Abilities in Botiga.
Do I need the WPVibe plugin?
You need it to connect external AI assistants like Claude, ChatGPT, or Cursor, since they reach your site over MCP through WPVibe. It’s also required on sites running WordPress versions older than 6.9, where it provides the Abilities API itself.
Is it safe to give an AI write access?
Write access is off by default, and only administrators can enable it. Every change runs through WordPress permission checks and the same validation and sanitization the Customizer uses, so invalid values are rejected before anything is saved. Complex controls that can’t be written safely are read-only. All changes appear in the Customizer, where you can review or change them again, and you can turn off write access at any time.
Why can my assistant read a setting but not change it?
Some controls, like media pickers and the header and footer builder structures, don’t have a safe generic way to be written by an AI yet. Botiga keeps them visible so your assistant understands your setup, but rejects writes to them. Your assistant is told why a field is read-only, and you can still change these settings yourself in the Customizer.
Can my assistant change my site colors?
It can change colors that belong to a specific section, like your sale badge or a header component. Botiga’s site-wide color palette lives in WordPress’s own Colors section, which isn’t part of Botiga’s abilities, so you’ll set those in the Customizer yourself.
Why did a setting save with a warning?
Some settings only take effect when a related option is turned on. For example, the sidebar position only matters while the sidebar itself is enabled. Botiga saves the value anyway, matching how the Customizer behaves, and warns your assistant that the setting is currently inactive so it can tell you.
What happens with Botiga Pro sections if I only have the free theme?
Your assistant can see which sections require Botiga Pro when it lists your site’s sections. Without Botiga Pro active, those sections aren’t available to change, and your assistant gets a clear message instead of an error it can’t explain.
Does this work on a local or staging site?
AI assistants connect from the cloud, so your site needs to be reachable from the public internet. Sites on local development environments, behind firewalls, or on private networks won’t be available to your assistant.
Why don’t I see the AI MCP section?
Make sure your theme is updated to Botiga 2.4.8 or later. You’ll find the section under Botiga in the Settings tab of the theme dashboard. On WordPress versions older than 6.9, the section only appears after you install and activate WPVibe, since that’s what provides the Abilities API.
That’s it! You’ve successfully enabled AI Abilities in Botiga and connected your AI assistant to your site.
Next, would you like to fine-tune your store’s colors yourself? Check out our guide on color options in Botiga to learn more.